QUICK START / Official Manual
Shadowrocket Setup Guide
Add existing details → Choose a mode → Connect → Test → Troubleshoot
This guide covers first-time use on iPhone and iPad. First connect to and test one server, then adjust rules and automatic connection conditions. For configuration structure and rule syntax, see the Configuration Reference.
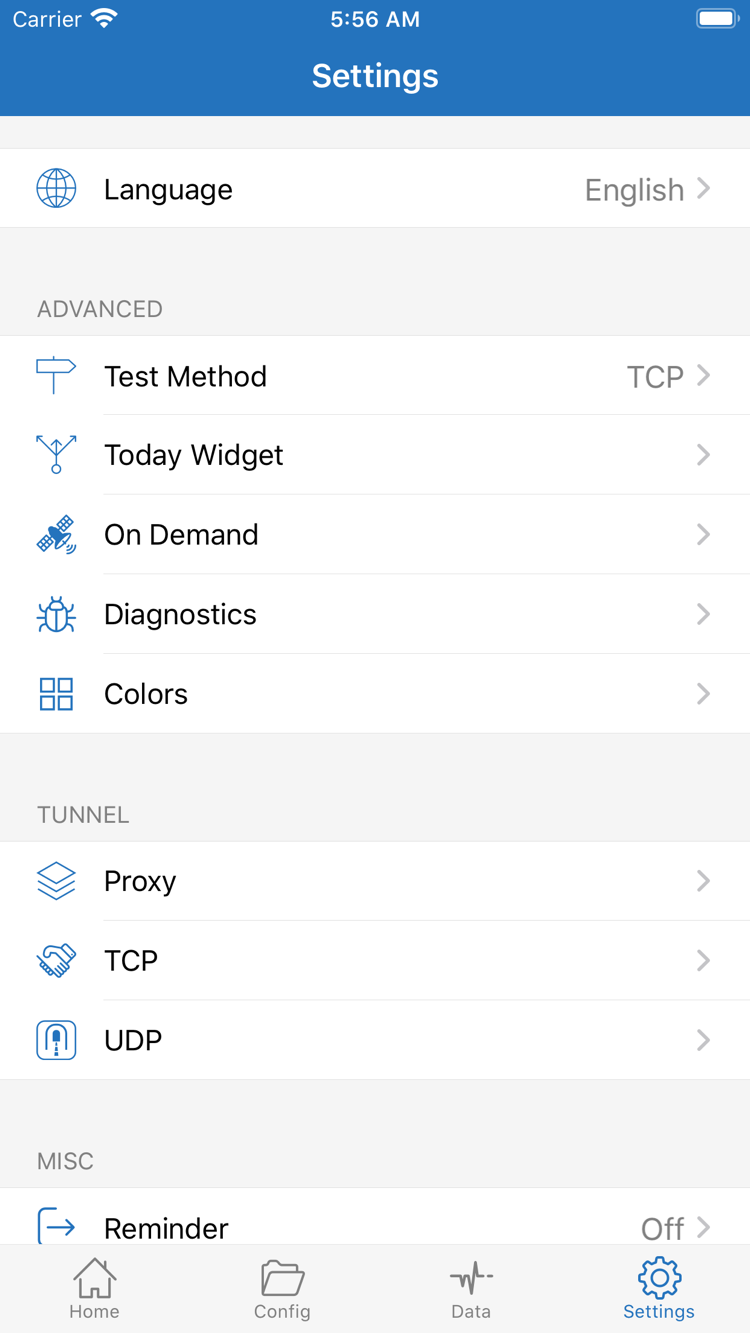
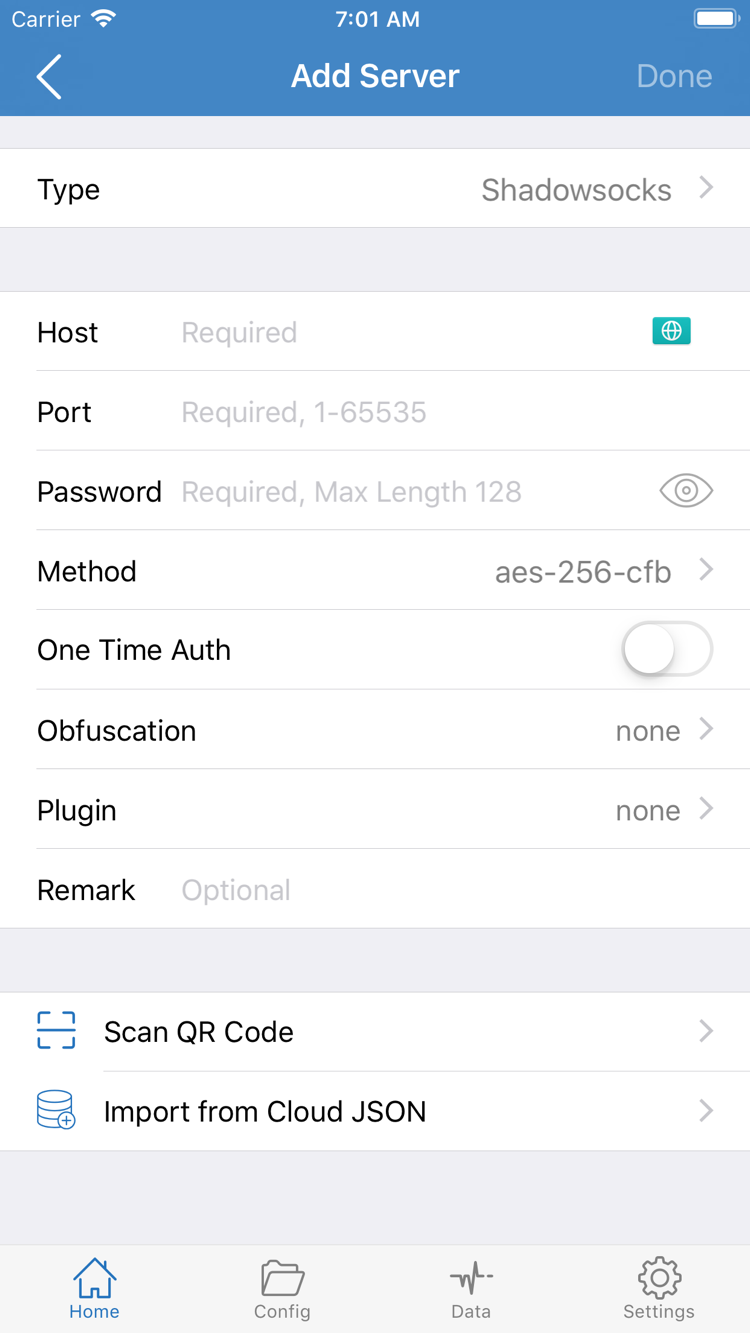
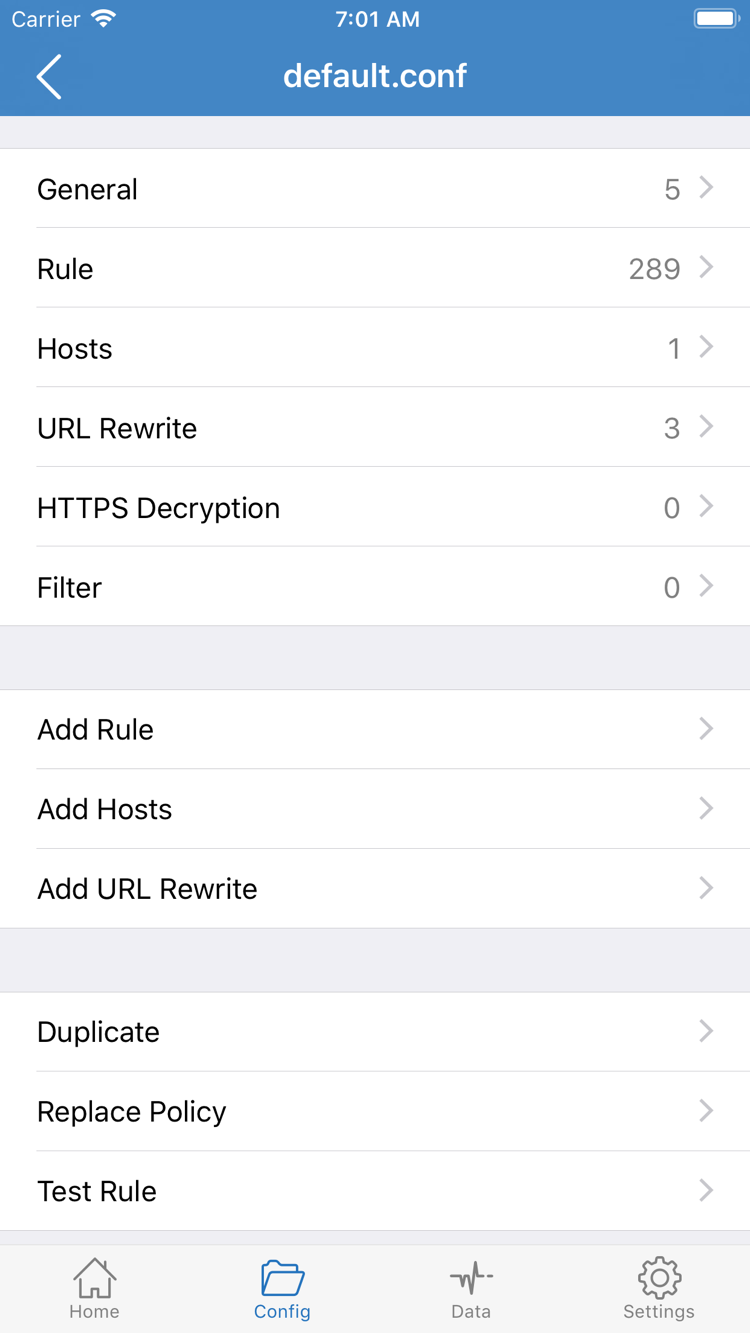
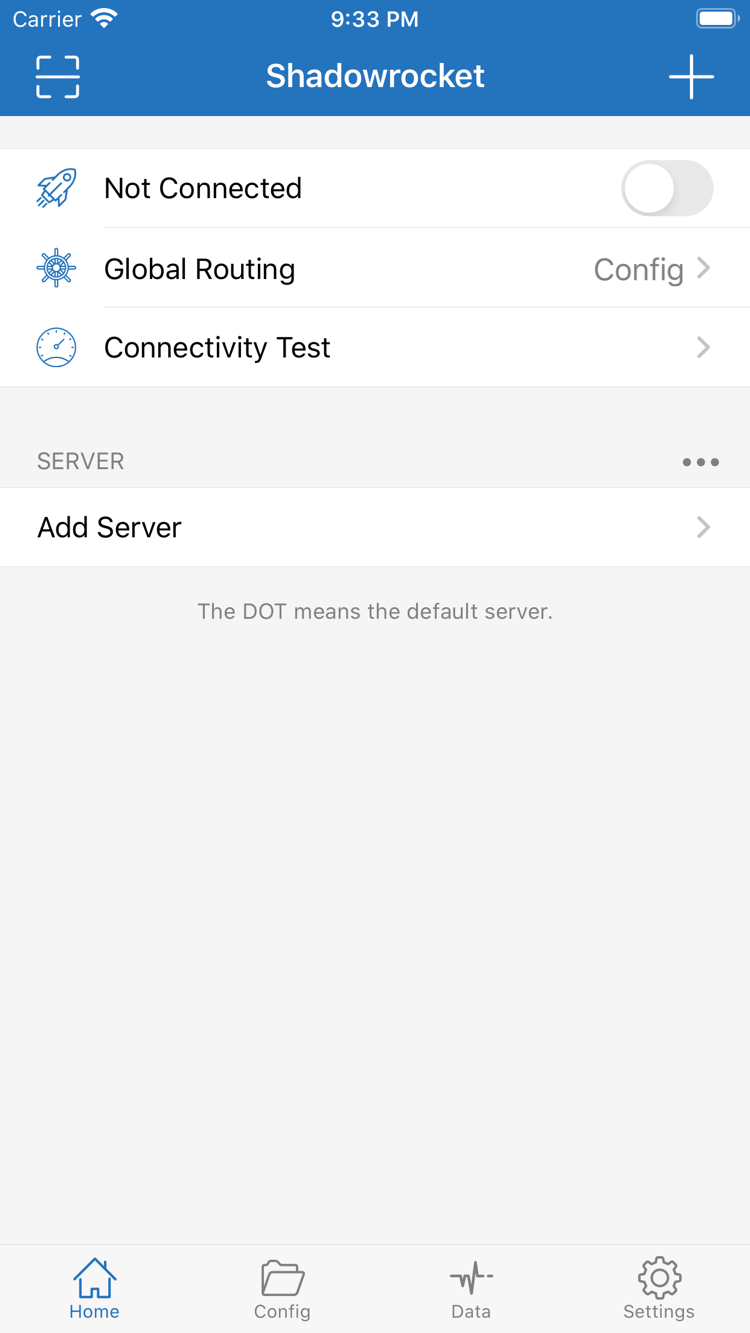
These screenshots are official App Store images, provided to help identify screens and fields. The sample list contents are not values to enter. Follow the app interface on your device, and use only your existing information for server settings.
STEP 01 / IMPORT
Add Server: Add a server or import a subscription
First, make sure a server with complete details appears on Home and can be selected. Then choose a routing mode.
Open Shadowrocket, go to Home, and find Add Server under SERVER. Identify what kind of details you have: if you have a single server’s address, port, and authentication details, add it manually. If you have a subscription link that can update a server list, choose Subscribe. If you have a QR code for a single server, you can use Scan QR Code. Don’t choose an import option based only on a similar-looking link; in particular, don’t enter a configuration file URL as a server address.
Enter existing server details manually
After tapping Add Server, choose Type, then fill in Host, Port, and authentication details according to the fields shown for that protocol. The official screenshot shows one form with Password and Method; other Type selections may show different fields. Choose the Type that matches your existing details—don’t switch protocols just because another form has fewer fields. Enter the server hostname or IP address in Host and the port number in Port. Unless the field explicitly asks for a URL, don’t paste a full link with a path into Host.
If your details include Password and Method, check the exact values and capitalization. For types such as VLESS, VMess, or Trojan, enter the existing identifiers, authentication, and transport details in the corresponding fields. TLS, server name, and transport path must also match the server. Don’t try a set of “common settings” when getting started. Ask your service provider for any missing details; leaving fields blank or guessing can let you save an entry that still won’t connect.
When you’re done, use the page’s save option to return to Home. Check that the new entry appears under SERVER, and give it a recognizable name. The name only helps identify the entry; it does not affect its connection capabilities. Avoid creating several entries at once. Use one entry with confirmed, complete details as the baseline for connecting and troubleshooting so you can pinpoint where an issue occurs.
Subscribe, QR codes, and configuration subscriptions
To import an existing server subscription, choose Subscribe under Type in Add Server, enter the subscription URL in the form, and save. Before pasting it, check that the link is complete and has no leading or trailing spaces, line breaks, or missing query parameters. After saving or updating, return to Home and check for server entries in the subscription group. If you see only a subscription name and no servers, you can’t test a connection yet; check the link contents and update result first.
When using Scan QR Code, scan only an existing server entry and check Type, Host, and Port after it’s recognized. Import from Cloud JSON is a separate import option with a different content format from a regular subscription link. Don’t keep trying the same arbitrary link in different import options. QR codes and subscription links may contain authentication details; don’t display them publicly or share them in ordinary screenshots.
Note that Subscribe in Config is for configuration subscriptions, which provide rules and related settings. It does not import servers into the list on Home. Successfully importing a configuration file does not mean you have a server you can connect to. First confirm that a selectable entry appears under SERVER on Home, then choose Global Routing in the next step. If the list is still empty after importing, see Troubleshooting: subscriptions and server imports.
STEP 02 / ROUTING
Global Routing: Choose how traffic is handled
Server details determine how a connection is made; Global Routing determines the path a request takes.
After importing, return to Home and tap Global Routing. Check whether Config, Proxy, or Direct is selected. These are not three server groups or connection quality levels. Changing the mode won’t fix an incorrect port or password. Note the current selection before testing so you don’t compare results from different routing paths.
Config: Follow the active rules
Config uses the rules in the active configuration file to decide whether requests follow policies such as PROXY, DIRECT, or REJECT. If you need rule-based routing, open Config and check which configuration is active, then review its contents. The editor includes sections such as General, Rule, Hosts, URL Rewrite, and HTTPS Decryption. Each serves a different purpose; you don’t need to edit them all to make your first connection.
Rules in Rule are generally checked from top to bottom. Put specific domain rules before broader rules; FINAL handles requests that don’t match earlier rules. This snippet illustrates the order: use DIRECT for example.com and its subdomains, and send other requests to the PROXY specified by FINAL. The example domain is not a server address, and this snippet is not a complete configuration file to replace your current one with.
[Rule]
DOMAIN-SUFFIX,example.com,DIRECT
FINAL,PROXY
Before using Add Rule, confirm that you’re editing the file currently in use. Save your changes and confirm the active selection in Config. Importing a file into the list without selecting it as the active configuration may not change the request path. For your first test, you only need to know which rule might match and whether its policy is what you expect. Don’t add many rules at once or enable HTTPS Decryption just to test a basic connection.
Proxy and Direct
Proxy routes traffic that can typically be proxied through the proxy, which can help reduce variables from rule-based routing while troubleshooting. System traffic and some exclusions may still follow their own handling rules, so this does not mean all data must pass through the server. Direct uses a direct connection and can help check whether the underlying network works, but it doesn’t prove a proxy server connection is successful. Neither mode requires you to create another server entry.
If you don’t have a specific routing requirement, note your current settings, test the existing server with Proxy, then return to Config to check for differences in the rules. If you have a confirmed configuration file, use Config and check whether the target request follows the expected policy during testing. Change one condition at a time. For details on rule types, policy names, and priorities, see the Rules and Configuration Reference. Next, connect.
STEP 03 / CONNECT
Home: Select a server and connect
Check the selected server and routing mode before authorizing the system.
Return to Home and tap the server you want under SERVER. Use the selection indicator in the list to confirm the active entry. Opening an entry’s details to edit it is different from selecting it in the list for a connection. If your subscription has several entries, choose one to test and stick with it. Switching servers, rules, and networks at the same time after each failure makes it difficult to tell what changed the result.
Check Global Routing again, then turn on the connection switch at the top of Home. Not Connected may appear while disconnected. When connecting for the first time, the system may ask permission to let Shadowrocket add a VPN configuration. Confirm the prompt was triggered by your connection attempt, choose to allow it, and complete authentication with your passcode or biometrics as prompted. This authorizes the device; it is not the server Password. Don’t enter server credentials into the system authentication prompt.
If you previously dismissed the authorization prompt, the connection may not proceed. Start the connection again and check for a system prompt. If none appears, check in your device’s system settings whether a VPN configuration exists and whether device management restrictions apply. Follow the organization’s requirements on managed devices; changing server fields repeatedly won’t resolve an authorization issue. After authorizing, return to Shadowrocket and check whether the status and switch at the top remain connected.
Turning on the switch only means the connection process has started. A VPN status does not guarantee that every destination is accessible. Wait for the connection status to stabilize, then run Connectivity Test and check actual access. If the switch turns off immediately, note the message and when it happened, then continue to troubleshooting. If it stays on but webpages won’t load, keep the current entry and mode while checking the request path.
While testing, prevent another VPN configuration from taking over the connection, and don’t enable complex On Demand conditions yet. If you switch from Wi-Fi to cellular data, the connection may need to be re-established; note which network you’re using. To disconnect manually, return to Home, turn off the top switch, and confirm the status changes. If it reconnects automatically, check On Demand conditions in Settings instead of repeatedly deleting server entries.
STEP 04 / CHECK
Connectivity Test: Check the connection and request path
Check “the test received a response,” “the tunnel is connected,” and “the destination is accessible” separately.
Once the connection stays on, tap Connectivity Test on Home and wait for it to finish. Results depend on Test Method in Settings, so check which method is in use before interpreting a response or timeout. A response only confirms that the conditions for that particular test were met. A timeout alone doesn’t prove that all app traffic is failing. Don’t treat the test list as a guarantee that every webpage and protocol will work.
Next, open a browser and visit a page you know normally loads. Check that the content and any follow-up resources appear. Return to Shadowrocket and review available connection or traffic records in Data. Compare request domains and policies with what you expect. In Config, a page’s main domain, image domains, and API domains may match different rules. If only part of a page loads, identify the failing requests rather than checking only the main domain in the address bar.
If access works with Proxy but not Config, check the active configuration file, rule order, and matching policies first. If both modes fail, prioritize checking server details, connection access, and the underlying network. A destination that works with Direct can help confirm the underlying network, but doesn’t show that the PROXY path works. Comparing one setting at a time gives clearer results than rebuilding a subscription, replacing rules, and changing DNS all at once.
Keep a brief record of your test: Wi-Fi or cellular data, selected server, Global Routing mode, Connectivity Test result, and how the page loaded. Use a recognizable name for the server, but don’t record passwords or full subscription links. Once one path works, repeat the same checks on another network. If only one network fails, you’ve narrowed the issue to that network rather than the entire setup.
STEP 05 / DIAGNOSTICS
Settings: Troubleshoot by where the failure occurs
Narrow down the issue in order—import, authorization, connection, then requests—and avoid changing multiple settings at once.
The import didn’t create a usable entry
First, confirm that your device can access the internet, then check whether you’re using a server subscription or a configuration subscription. If the subscription group on Home is empty, check that the address is complete, still valid, and whether an update message appeared. Don’t post a full subscription link in public; its query parameters may contain access credentials. If a manually added entry saves but won’t connect, check Type, Host, Port, and authentication fields again. Saving successfully doesn’t mean the server accepts those details.
The switch turns off, or the connection stays on but access fails
If the switch turns off immediately, check system VPN authorization and device restrictions first, then review the connection error shown by the app. If the connection stays on but requests fail, check whether the server is reachable, your account still has connection access, and the current network allows the required transport. For manual entries, check the TLS name, transport, and path against your existing details. Checking only the password doesn’t confirm that all settings are correct.
In Settings, check Test Method and Diagnostics. The former affects how test results should be interpreted; the latter helps inspect diagnostic information. Neither automatically repairs a server. Note whether the error occurs before the connection is established or after a request is sent, then decide whether to check authentication, transport, or rules. For initial troubleshooting, don’t change multiple Proxy, TCP, or UDP options at once. Keep the defaults or your confirmed settings, and start with the option most likely to explain the error.
Rules, DNS, and On Demand
If only Config fails, open Config and check the active file for rules matching the target domain and the FINAL policy. A broader rule higher up may prevent a later, more specific rule from matching. For DNS issues, first confirm that the device’s network works, then check the resolution settings in General. A DNS lookup failure is different from a server authentication failure. Don’t change all domain rules or DNS settings to address a problem with a single destination.
On Demand starts a connection when its conditions are met; it does not mean the connection stays on in every situation. For your first test, connect manually and confirm the server and rules work before setting up On Demand. If the connection restarts after you turn it off or changes when you switch networks, check the conditions first. Today Widget settings relate to quick actions and don’t replace checking the selected server and Global Routing on Home.
If results differ between Wi-Fi and cellular data, retest each using the same server, mode, and test method. Comparisons are useful only when you change one condition at a time. After each change, save, reconnect, and repeat the test before deciding whether to keep it. Before sharing diagnostic records, hide passwords, authentication identifiers, full subscription URLs, and personal network details. Keep the error type and the order of relevant steps.
After these five steps, you should know which server and Global Routing mode are in use and what the test results show. If the cause is still unclear, see Troubleshooting. To adjust Rule, General, or DNS, consult the Configuration Reference. After updating a subscription or changing a configuration, repeat the checks: select an entry → connect → test → check actual access. Don’t assume an import has taken effect just because it succeeded.